

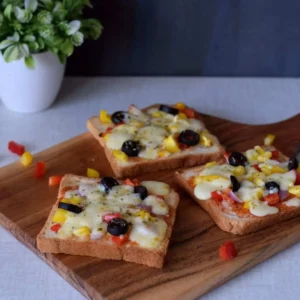
Air fryer garlic bread is a delicious and simple snack or side dish that takes less than 15 minutes to prepare. This dish, made with fresh bread, garlic, and butter, is ideal for garlic and bread lovers.

The air fryer adds a crispy texture on the outside while keeping the inside soft and fluffy. You can prepare a side dish that goes well with any meal and satisfies your taste buds in a matter of minutes.
Garlic bread is our favorite, and we frequently order it as a side dish with pizza or pasta, or simply as a snack with coffee. Making this garlic bread at home has become easier thanks to the invention of the air fryer. You also don't have to turn on your oven, which is especially convenient in the summer.
Jump to:
Ingredients
Bread: Generally, French Baguette is used for making garlic bread. However, I have used regular whole wheat sliced bread for this recipe. You can also use white sandwich bread for the same.

Butter: I prefer to use salted butter for this recipe. To make garlic butter, always use softened butter that can be easily whisked. Set butter out on the counter for about 1-2 hours to soften before using it in a recipe.
Garlic: This is one of the key ingredients for this dish. I would recommend using fresh garlic to get the best flavor.
Cheese: We enjoy cheesy garlic breads and prefer to top ours with mozzarella cheese. You can also add grated parmesan cheese.
Seasoning: dried herbs especially Italian seasoning, chilli flakes, etc.
How to make Air Fryer Garlic Bread at home?
If you are using French Baguette, then cut the bread and make suitable pieces. I have used sandwich bread slice, hence I cut them into triangle. If you do not prefer the crust of the sandwich bread, you can remove it. However, I have kept the crust.
Now take the softened butter in a bowl and mash it with a fork. Next add freshly crushed or grated garlic pods and dried herbs in the butter and combine well.

You can use your choice of herbs. We prefer Italian seasoning; hence I love to add oregano or mixed herbs.
Spread the mixture generously on the bread slices. Now add grated cheese and chilli flakes on top of each bread slice. If you do not like cheese garlic bread, then avoid adding cheese on top.

Pre-heat the Air Fryer at 350 degrees F (180 degrees C) and place the garlic bread in the air fryer basket and Air Fry for 2-3 minutes to get crisp cheesy garlic bread. If you are using Baguette slices, then it might take 1 or 2 minutes extra than normal bread slices as they are thick compared to normal bread slices.
Carefully remove from the air fryer and place on a serving plate and serve immediately.
Serving Suggestions
You can serve garlic bread as an appetizer or as a side dish with soups, pasta, spaghetti or pizza.

Storage
I always recommend that you make fresh garlic bread. However, if you have leftover garlic bread, then keep them in an airtight container and store in the refrigerator for 2 days.
You can re-heat them either in air fryer or microwave oven.
Top tips
- For the garlic bread, always use freshly grated garlic. I don't like garlic powder in this recipe.
- Use softened butter which is easy to spread over the bread slices.
- Place the garlic breads in the air fryer in a single layer rather than stacking them. Also, don't overcrowd the air fryer.
You Might Also Like

Air Fryer Garlic Bread
Equipment
- Air Fryer
Materials
- 4 no Bread Slices cut into half makes 8 triangular pieces
- 4 tablespoon Salted Butter
- 1½ tablespoon Garlic Pods grated
- ⅔ teaspoon Dried Herbs
- ½ teaspoon Chilli Flakes
- ⅔ cup Cheese grated
Instructions
- Cut each bread slice into triangles and keep aside.
- Now, in a bowl, mash the softened butter with a fork.
- Then, in the butter, combine freshly crushed or grated garlic pods and dried herbs.
- Spread the butter-garlic mixture on the bread slices generously.
- Top each bread slice with grated cheese and chilli flakes.
- Heat the Air Fryer to 350°F (180°C) and place the garlic bread in the air fryer basket. Air fry for 2-3 minutes to get crisp cheesy garlic bread.
- Allow to cool the bread for few minutes and later serve it.
PIN to read it later!
Also find us on:
Facebook | | Pinterest | Twitter | Instagram
If you are trying any of our recipes, we would love to see the pictures of your dishes. Tag us in any of our Social Media Handles or use #motionsandemotions. You can also send us your feedback and pictures at: jhumu.here@gmail.com or motionsemotions.here@gmail.com.

Leave a Reply